Lara's Portfolio

EDCI 336 Learning Experience

Reflection #8

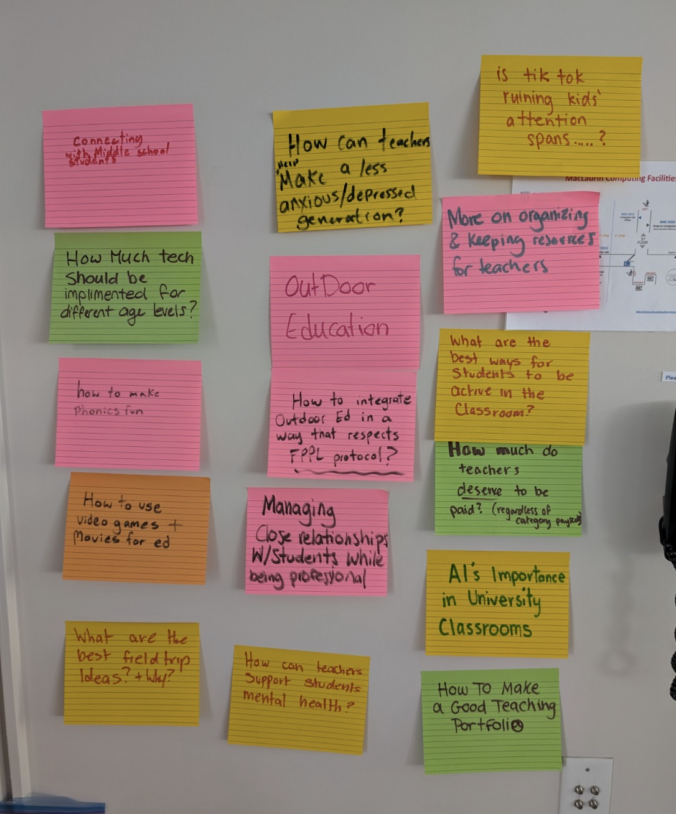
Last week, our class discussed technology and outdoor education. I’ve never thought about technology and outdoor education being used together before now. Usually, when I think of outdoor education, I think of getting away from technology, especially considering all the concerns around students’ screen time. However, during Kristen Pierce’s presentation I realized that technology can be a great tool to include in outdoor education and can make outdoor learning more engaging for students. For example, my class embarked on an outdoor QR code scavenger hunt. This was a great way to get outside and learn a bit more about the use of technology in outdoor education. An activity like this would also be a great way to get students outside and moving while still doing school work, such as creating a QR code scavenger hunt where each QR code takes them to a different math question they need to complete. 

I decided to try a few of the resources that Kristen shared with us in her presentation.

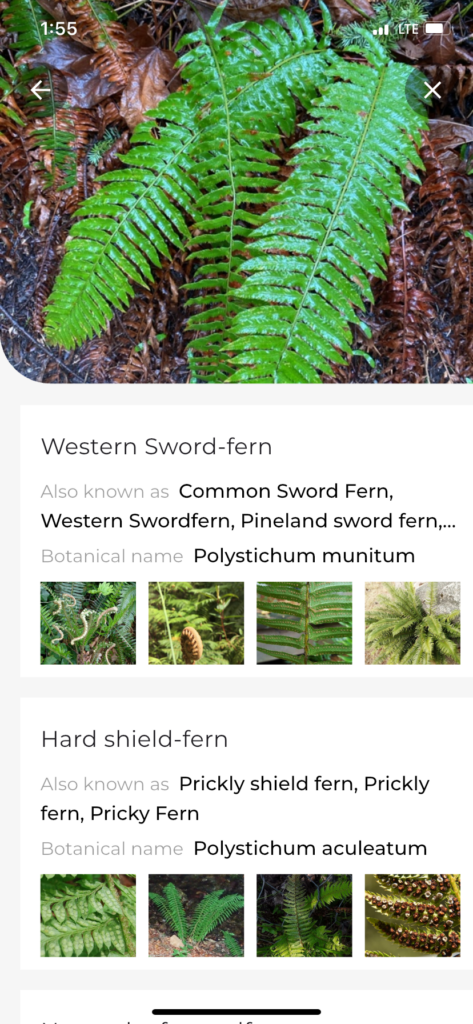
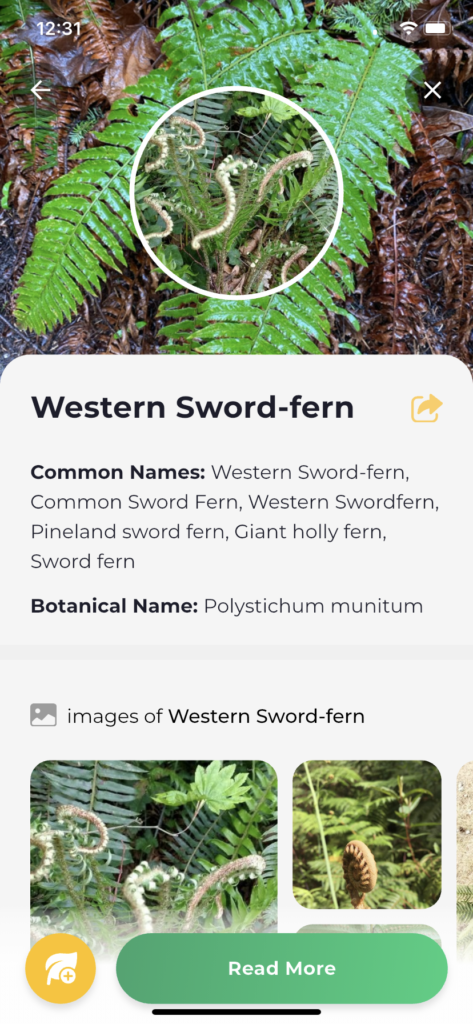
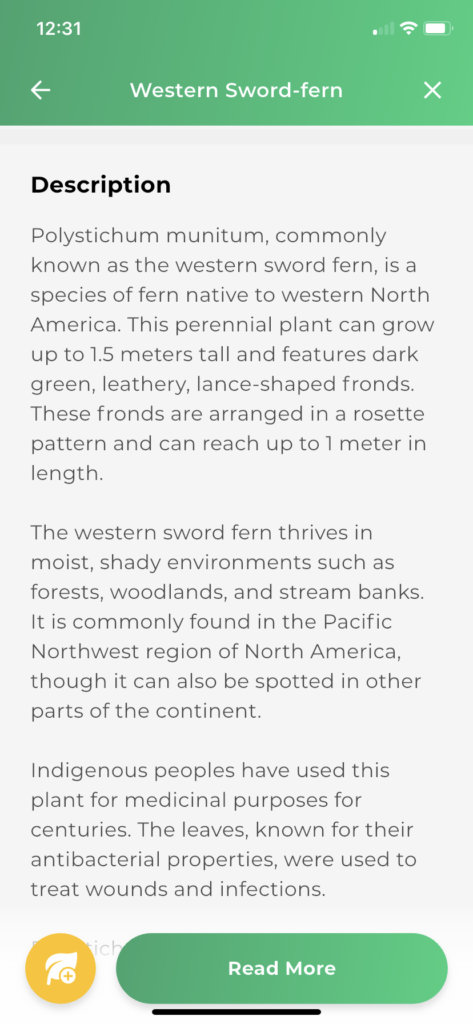
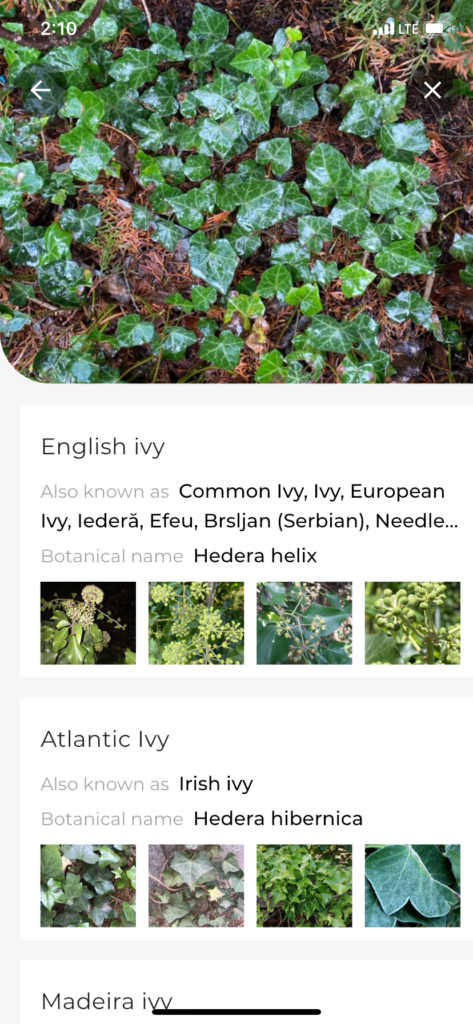
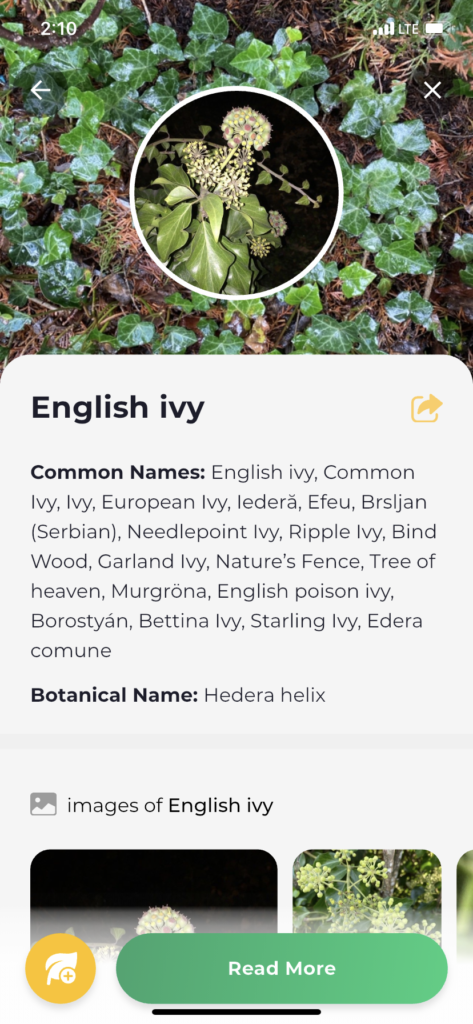
LeafSnap is a useful app for identifying and learning about different plants. You simply take a photo of the plant you would like to learn about in the app, or upload a photo from your camera roll. The downfall to this app is that it doesn’t tell you exactly what the plant is, but provides a few plants that it could be. The most likely one is put at the top, but I could see it being challenging to determine which exact plant it is. The time of year could also have an impact on this. For example, whether or not the plant is flowering or if the tree has all its leaves. Additionally, google also has a similar feature where you can search with your camera.

Here are some screenshots I took from the LeafSnap app on my phone:

I also tried the app ChatterPix Kids. I thought this was a fun way to present some of the information I learned on LeafSnap about the Western Sword-fern. I think using these two apps together like what I did would be a fun activity to do with your class. You could challenge everyone to find a different plant, learn a bit about it, and then create a video on ChatterKid to share with the class. An extension for this could be to research how local Indigenous Peoples have used and or continue to use the plant. 

Here is a video I made using ChatterPix Kids:

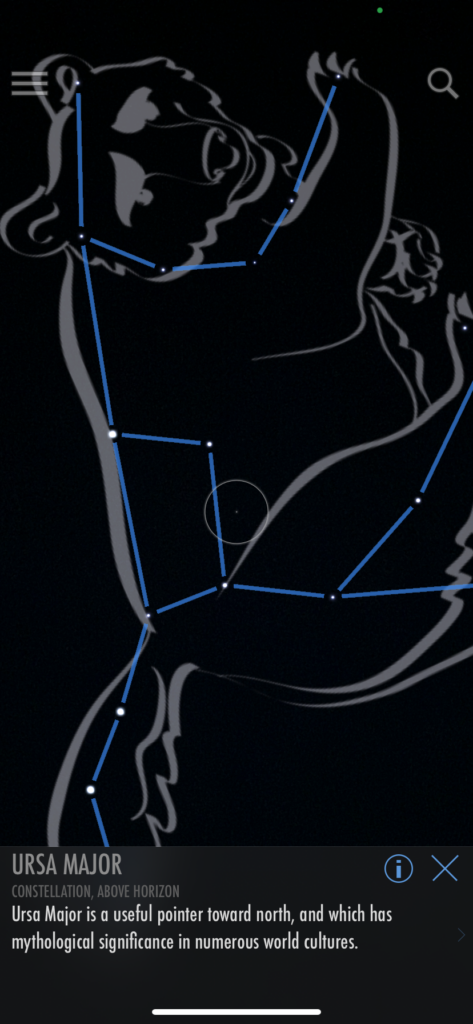
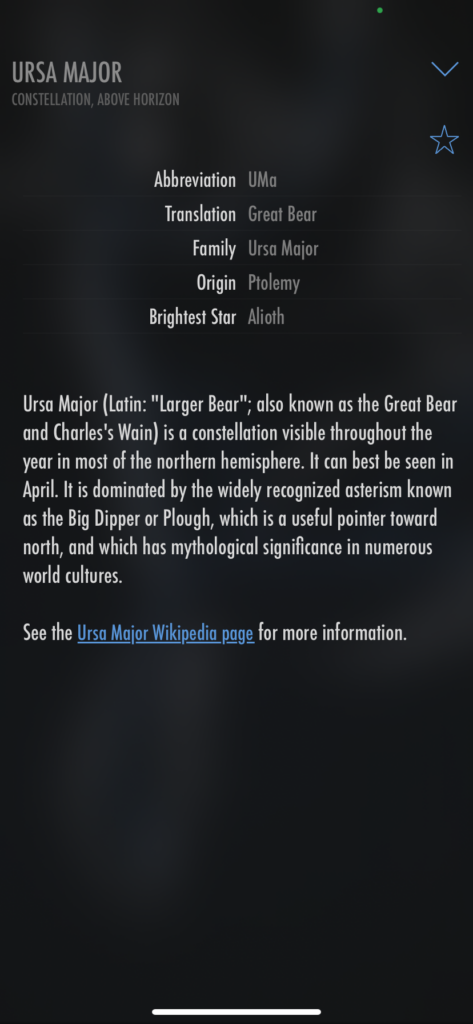
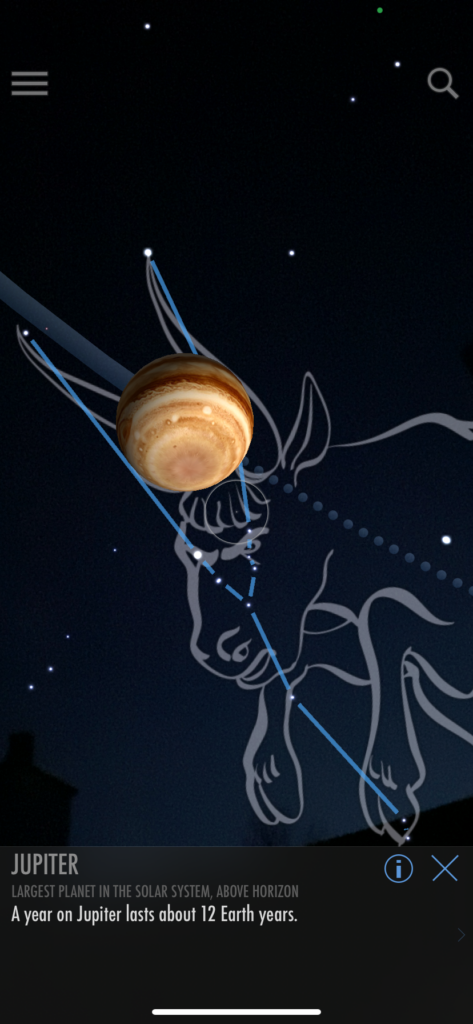
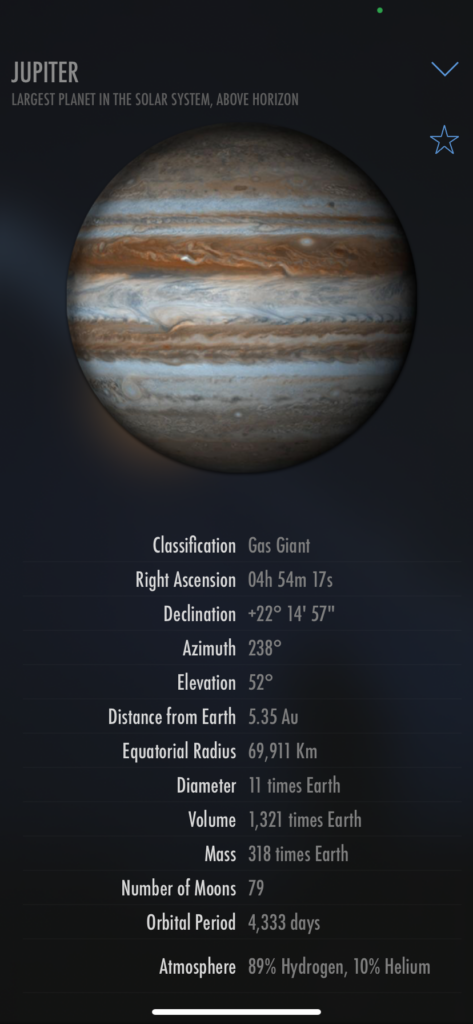
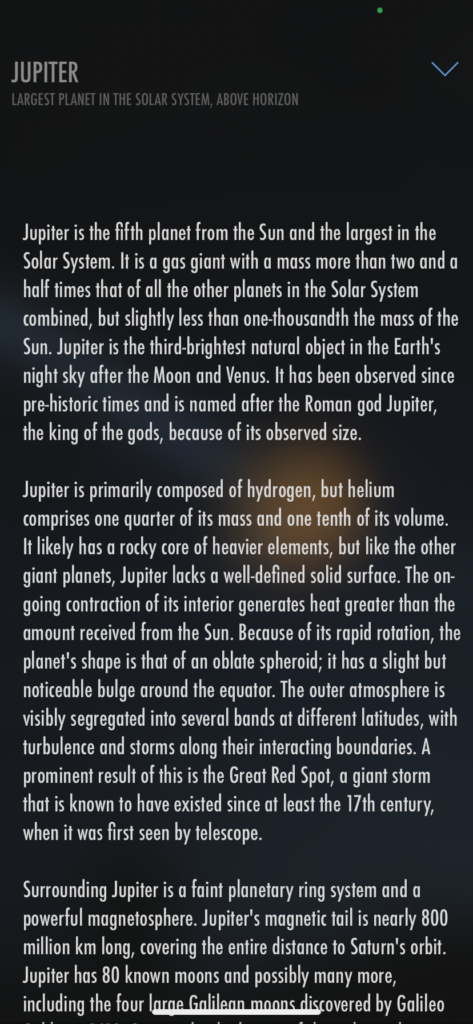
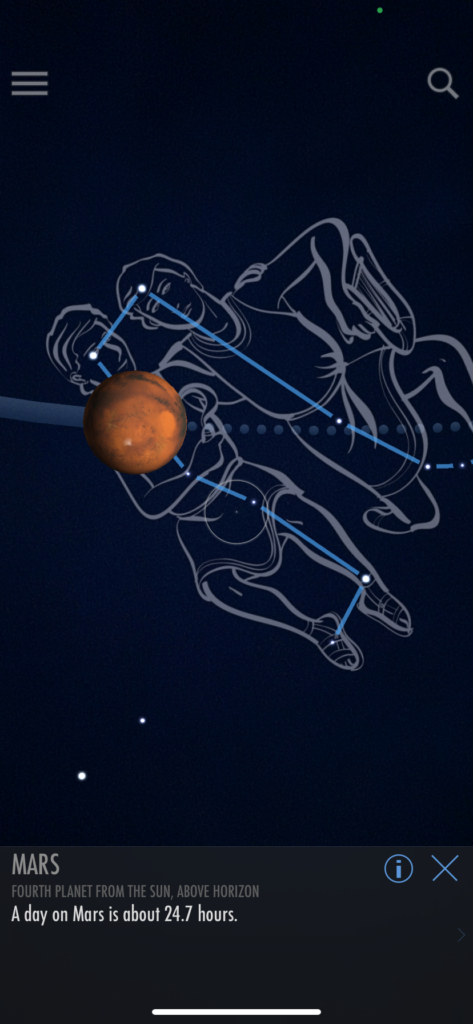
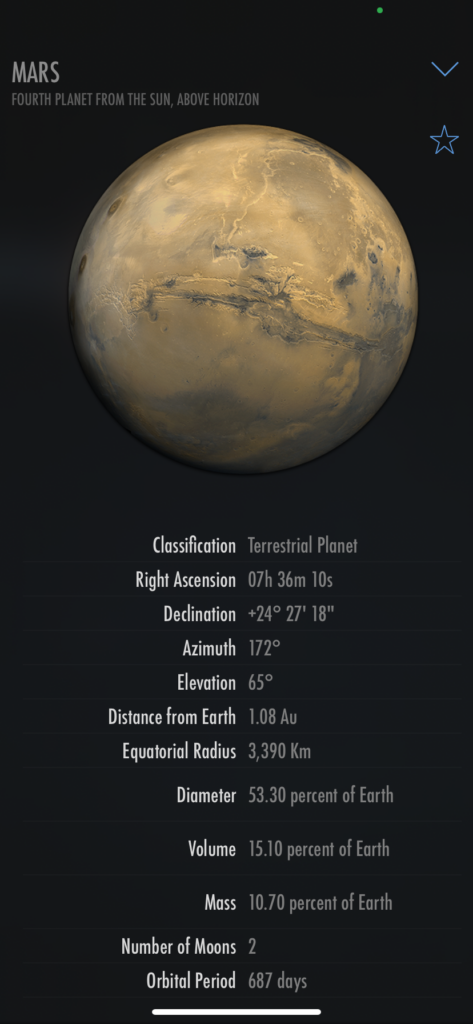
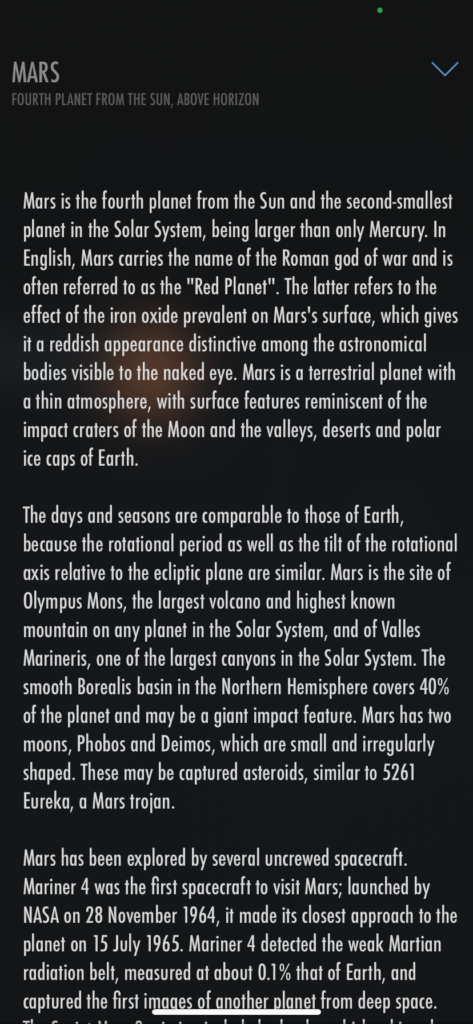
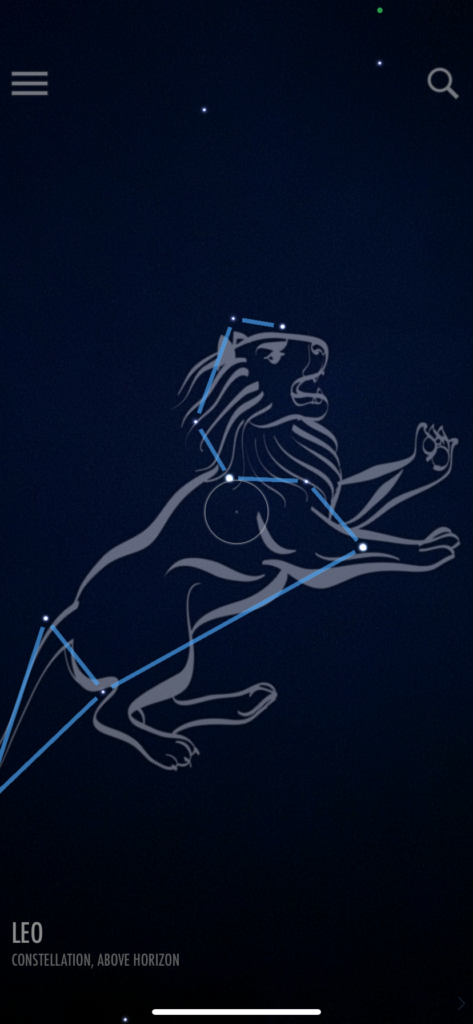
Lastly, I experimented with the app SkyView Lite.I really enjoyed using this app at night, it was so cool to see the constellations and where the planets were. The nice thing about this app is that you can use it during the day when it’s light out or when it’s cloudy, you can even see stuff when you point it at the ground because it works based on your location. Also, you can click on a consolation, planet, or moon, to learn more about it. 

Here are some screenshots I took while using the SkyView Lite app on my phone: 

Cluster Necklace

For this necklace, I played around with using Stop Motion. I think this would be a really cool platform to bring into a classroom. Students can get creative and make fun stories with it. It is quite tedious and can be very time consuming, but I think students would be really engaged with any project that uses stop motion. The nice thing about using stop motion is that you can see your progress as you go. This was a great motivator for me when I was creating my necklace because I got to see it slowly come together and look better and better with the more I added to it.

Check out the stop motion I created:

The final product:

Reflection #7

Last week, guest speakers from BCEdAccess talked to my class about inclusive and accessible education. I felt that this was a very helpful presentation, particularly because we haven’t discussed IEPs and accessibility in education in depth yet. As a student who went through the process of being assessed and getting an IEP, I really appreciate that the guest speakers were able to shed some light on the topic, especially for others in my class who may not be aware of what that process looks like.

As I was reflecting on the BCEdAccess presentation, I wanted to share some insights from my own experience as a student with an IEP, which may be helpful to future teachers. Before, I want to note that this was my experience as a student with dyslexia. My experiences may not apply to all students or situations involving IEPs, but could be some food for thought for teachers.

  1. I think it’s important to keep in mind that some students with IEPs may not necessarily understand why they have an IEP. I didn’t know I had dyslexia until I was in grade 11. I was never told why I was getting the accommodations I was getting throughout middle and high school, and it was confusing for me. Sometimes I just felt dumb. Possibly checking in with a parent about if their child knows why they have those accommodations could be helpful. This could lead to a chat with the child and helping them understand why.
  1. Some students may not want to use their accommodations because it makes them feel different and singled out. Other students may ask them why they are getting more time on a test…etc, and declare that it’s not fair. And, when you aren’t sure why you get extra time, like me, it can be hard to explain to your friends. My brother also had an IEP and he never wanted to use his accommodations. I think what could have been really helpful to me, is if a teacher could have helped me craft a response to some of those comments and questions I got from other students.
  1. Just because a student has an IEP, does not mean they are any less intelligent than other students – they often just learn differently or have different strengths and need a little more help. I think some teachers have an unconscious bias that students with IEPs do worse in school. I was often at the top of my classes in high school and I had a few teachers that didn’t understand why I was getting these accommodations if I was doing so well. This goes back to what our guest speakers said about how accommodations don’t just go away. The fact that I was doing well in school showed that my accommodations were helping me to achieve the level of education I was capable of achieving. 

Intersectional identities was a new term for me during this presentation. I thought it was a very eye-opening and important concept to be aware of when teaching. I found this video that explains intersectional identities in a very clear and meaningful way. Could be a helpful watch if you don’t fully understand intersectional identity yet.

Hoop Earrings

Here’s a step by step of how I created these earrings!

Matching Earrings

I had some leftover beads from the necklace I made last week. I had linked them together, but had to trim them off because the necklace ended up being too long. I thought they would be perfect for creating a matching pair of earrings! I just added some hooks and a larger pearl on the ends to match the one on the necklace.

Reflection #5

Last week, we did this really fun activity called EdCamp. EdCamp is a way for people to collaborate and discuss ideas that interest them. Here’s how it works: Attendees write down topics or questions they want to explore and post them on a wall. Afterward, everyone votes on the topics they are most interested in. The topics with the most votes become discussion groups that participants can join. The topics shared are usually centered around a specific theme. For example, our class explored topics related to teaching and learning.

For EdCamp, my group discussed ideas around field trips. We debated whether it’s better to do a field trip before or after learning a particular unit. We agreed that going after some learning had taken place was the best approach. This way, students can apply what they have learned, in class, on the field trip or build upon it by exploring new ideas that might have been difficult to grasp without some prior knowledge. We also discussed how field trips could serve as a reward system or a motivational tool during a unit. Additionally, we explored virtual field trips and discovered some cool websites teachers could use if going in person isn’t an option. For example, the Royal BC Museum offers a virtual tour where you can “walk” through the museum on your computer screen. 

Here are some resources we found:

I thought this was a really neat activity, and I could definitely see myself using it with my own class someday. You could also modify it so that the teacher chooses the topics they want their students to explore, and then students can pick whichever topic interests them most. Alternatively, the teacher could post several different topics for students to vote on, then break them into groups based on the most popular choices. Afterward, students could share what they’ve learned with the class, ensuring that everyone gets a chance to learn about each topic. I think EdCamp could also be a valuable tool for review, whether before a test or just to reinforce learning. For example, if a science test is coming up, students could write down topics they still need help with or need to review, and post them on the board. Then, students could vote for the topics they also feel need reviewing (not every student needs to post a topic). The most-voted topics would then become breakout groups where students focus on reviewing that particular topic. Additionally, I think this could be a fun activity for when reading a book in class. Students could post questions or discussion topics related to the book being read, vote, and break into groups to discuss different aspects of the book. I love that EdCamp is very student-led, and I think it would be a fantastic way to engage students in class. 

This reflection was edited with the help of ChatGTP.

Necklace

Check out this video I made of the process of making this necklace. I had to split the video up into two parts.

Part 1:

Part 2:

Earrings #2

These are by far my favourite pair of earrings I have made! I have always preferred wearing post over hook earrings due to my ears being very sensitive, but it’s hard to find nice dangly earrings with a post. I saw this post on Pinterest of a pair of post-dangly earrings that I loved and wanted to recreate for myself. The process was relatively easy especially because I had practiced working with the same chain and technique of attaching the pearls when I made my bracelet. The trick was figuring out how long the chain should be and making the chain lengths even for both earrings. I played around with the chain, lining it up on the earring to find my desired length and then once I cut the chain I did my best to line it up with another piece of chain for the other earring. I found this to be easier than trying to measure it out by counting the individual chain links. Overall, I am really happy with how they turned out and I have been wearing them almost everyday!

Here is my inspiration from Pinterest:

Here is what I created:

Reflection #4

Last week, our class discussed the benefits of using videos as a learning tool. Videos have been used throughout my schooling. I always found them useful in my learning because they tended to be more engaging to watch and listen to than always listening to the teacher. I remember watching lots of science and psychology videos. Often these videos were able to explain concepts succinctly while providing helpful visuals. While I was aware of some of the benefits of videos, there were some I hadn’t considered. For example, our class discussed how videos allow students to see the unseeable. If you’re teaching your class about plate tectonics, videos provide a great way for students to visualize how they work. Additionally, videos are extremely helpful for independent learning. If a student is stuck on a concept, they can watch a video, pause it, rewind it, and rewatch it as many times as needed. As a teacher, even if you don’t show the video in class, it can be helpful to share videos with students that they can watch at home for more explanation. We also discussed the benefits of teachers and students creating their own videos. For example, teachers can create videos of themselves demonstrating a process, perhaps they make a video of themselves walking through the steps of a task using screen sharing, allowing students to watch and follow along. Students can make videos as a way to demonstrate their learning, this allows for creativity and a different form of showing their understanding. This led to our video workshop with Rich McCue from the Digital Scholarship Commons. In this workshop, we used iMovie to create our own videos and experiment with its various features. I am fairly familiar with iMovie, but the workshop was definitely a good refresher since it had been a while since I used it. As well, the website Rich McCue shared with us is a great cheat sheet for how to use iMovie. There is also a section on how to use green-screen videos. I didn’t get that far in the workshop, but I am excited to explore it further. I can totally see my group using that function in our educational technology project. 

The video I created in our video workshop is a little compilation of some of my favourite clips from my backpacking trip in 2023. Because I took these videos with my phone upright, it won’t fully take up the screen. In the future, I’ll have to take videos horizontally on my phone to get a better-quality video. Check it out!

« Older posts

© 2025 Lara's Portfolio

Theme by Anders NorenUp ↑